Birth of a Powder Horn 101: Crafting Powder Horn
By Mark A. DeCou
(All photos, text, and design is protected by copyright November 12, 2007)
http:\\www.decoustudio.com
A Powder Horn?
Some would first ask, 'What is it?'
After that, the usual question is, 'Why?'
Then, the usual response is, 'How long does it take';and why would you do it?'
Making Powder Horns is like a lot of things you can do, in that If you have to ask, 'Why?' then this blog isn't for you. Maybe building your own computer, or restoring a car, or growing monster pumpkins, or cooking is your thing. I won't laugh at you.
Folks that like old-style folk-art crafts, often called Paleo-Arts, get 'it', the rest just don't. I'm ok with that.
No apologies then, it takes a lot of odd folks like me to make the world go around. We add 'flavor,' so to speak.
In this short photo journal about crafting a powder horn, I'm hoping to instill a little respect for the amount of time involved, and also to help others that might wish to build their own Powder Horn. Some experts believe that Historical Scrimshaw Powder Horns are the highest form of collectible American Folk-Art, being both rare and original. Finding antique examples is hard, and collectors are willing to pay many thousands of dollars for authenticated pieces. Still, I feel that Scrimshaw Powder Horns has yet to hit it's peak. It's coming!
And, don't be fooled by those eBay lines:
”I don't know how old this is, I found it in my great grandfather's attic..."
I bought one of those eBay horns on purpose once for $60.00. It was just as I suspected, a shabbily built brand new horn, stained with leather dye to look old, and scrimshawn with a Dremel burr. I use it in showings of my own work to demonstrate the differences between a $60 horn and a $1000 horn.
Still, at $1,000/each I don't make much per hour on them, but that's another story for later in the article.
This version of the instructions is free, but if you want the full-monty, you gotta pay for it. I will also teach you if you want to host me somewhere, or I can host you here. The shop's a mess, but you'll learn to love it like I do. I can't do the teaching for free though, sorry. Email me if you are really serious about learning more. Otherwise, send me a note after you have started your own journey, I will enjoy reading about your progress.
- - - - - - - - - - - - - - - - - - - - - - - - - - - -
A Bit of History:
Before plastics, and before the brass cartridge bullet, folks that wanted to shoot a gun had to carry a substance called black powder. If this material is kept dry, it stays in a powder form, and can be poured easily, and then when lit with a spark, will burn rapidly. However, damp powder cakes up, and wet powder doesn't burn. Niether situation is good, whether you're hungry for meat, or running for your life.
So, ingenious crafts people in those days, used a practical item that was readily available, inexpensive, and water and humidity proof, namely the horn of a bovine animal, either cow, steer, or bull. Other animal antlers and horns have also been used in the past, but the bovine horn seems to have been the most prevalent carrier of black powder. But, as things always go, technology solved the problem of a bovine horn, and steel and brass containers were also used, and became readily available from many factory catalogs and stores.
Once the invention of the cartridge cased bullet became widespread, black powder and their firing guns became obsolete, relegating them to wall hangings and forward thinking collectors. The interest rose again in the latter half of the 20th Century, and several small machine shops around the world started to reproduce these old guns and the powder horns. Today, a craftsperson can buy every single part to build an historic rifle, with DVD's and books describing the steps. We live in a great age, if you like building obsolete things, just because they are beautiful, and because you 'can.'
For the Paleo-artist and craftsperson, making your own powder horn and decorating it with scrimshaw engraving is almost too fun to pass up. So, if you'd like to try it yourself, here are a few easy steps to help guide you in your own journey.
I will warn you, people will start to think you're odd if you build these contraptions, and if you've read this far, they probably already do, so let's get started.
Note: If you want the full discourse with all of the tips and instructions, you'll have to pay for that, so just email me if you are that interested and we'll discuss the rest. This is meant to be a 'tickler' blog, and I have bills to pay just as you do.
Crafting a powder horn can be done with limited tools, sincere patience, and with a little experience, the results can last many lifetimes. Over the years, I have read and studied, and practiced the craft of powder horn building, and it all started when a friend, took some of his free time and showed me the basic steps, let me read some articles on the steps involved, and then even gave me some horns on which to practice. From that, I crafted my first powder horn. It sort of took off from there. I think that is the best path for any Paleo-artist: do it because you like it, then if it sells, great.
- - - - - - - - - - - - - - - - - - - - - - - - - - - -
Finding Horns:
One of the first questions a person usually asks me when they are wanting to build their own horn, is 'Where to find the horns?'
Wow, this is getting to be a tough thing. I have been told that the supplies for horned cattle are down due to the Hoof-n-Mouth disease problems, or the Mad Cow, or just the market. For the most part, American ranchers don't want horns on their cattle, so they either cut them off when the calves are young, or breed the cattle to eliminate, or reduce the horns. This is a bad thing for powder horn builders. So, you have to be on the lookout where ever you drive, for potential horns. When you find some, buy a bunch, as they won't be around the next time you go by.
Over the years, several people have offered horns, or given directions to someone's house where there were to be lots of horns, and so on. After a while, finding the ultimate stash of useable horns takes on a 'Rural Legend', similar to those Legends of people that searched hundreds of old barns for mid-60's Corvette's left behind by soldiers killed in Viet Nam, or the old Pan Head Harley.
But, in reality, finding horns has been quite a struggle. It is not so hard to find cattle horns in the middle of the prairie in cattle country, but finding ones that lend themselves to building a historically accurate powder horn are few and far between. Also, small worms love to eat the horn material, so if they are left unprotected on the ground, or in a barn, they are quickly riddled with channels and holes. One collector of my horn work sadly had this insect damage problem occur when he stored a buffalo powder horn on the carpet in a storage closet inside his house. I was able to repair the damage by removing the channels, but had there been holes bored, there would be no unnoticeable repair I could have done. I prefer to store my raw material in a covered container, and display the finished horns on a wood display stand, and occasionally with a clear acrylic box dust cover.
The color, texture, shape, length, thickness, and the amount of twist are critical to find a horn that will look like an historical powder horn. Think about it, if you are going to spend then next 100-200 hours building something, do you really want to start with a poor quality raw product? I didn't think so. Don't ask me for a horn, mine are already 'taken,' you'll have to find your own, ha. I'm not that cantankerous, just trying to be funny.
- - - - - - - - - - - - - - - - - - - - - - - - - - - -
Assuming you now have a horn, let's get to work:
Step 1: Cutting the Horn End Square. I use a chop saw which gives me a straight cut across the diameter, but holding it straight and without wiggling while cutting is a bit tricky. At this point in my life, I'm pretty steady handed, but if you are not, use another method. Marking a line all the way around the circumference, and cutting with a hacksaw, or a bandsaw is also another method for the faint of heart. I have done this work with a handsaw when a commissioned customer requests that I only use traditional Horner's tools. I don't normally choose only hand tools, or just power tools. I select the best tool to use for each operation.
Photo 1:

- - - - - - - - - - - - - - - - - - - - - - - - - - - -
Step 2: Drawing the Outline of the Horn on a board.
I prefer to use this method for matching up a cut pine plug to horn instead of boiling and forming the horn to a perfectly round shape with a die. I have done both, this is just my preference for the style of horn I enjoy building. I have also built 1820's era horns, and have lathe turned the round plugs. I'm hoping that the next time I build a horn like that I will take photos, and then will add those steps to this photo journal. But, for now, I'll make an asymmetrical pine plug that fits the natural shape of the horn end, typical of a late 1700's age horn.
Enough talk, let's work.
Hold the horn still on a pine board, and draw a pencil line around the outside circumference.
Photo 2:

- - - - - - - - - - - - - - - - - - - - - - - - - - - -
Step 3: Cutting out the Pine Plug
I prefer to use a bandsaw, but a hand coping saw will also work, I've done it both ways.
Photo 3:

- - - - - - - - - - - - - - - - - - - - - - - - - - - -
Step 4: Hand Fitting the Wood Plug.
There is no quick and easy way to fit the shape of a wood plug into the out-of-round, tapered, inside diameter of the horn. I start by marking the inside of the horn with a soft pencil.
Photo 4:

Then by inserting the wood plug, the soft pencil graphite will mark where the plug is touching the horn.
Then I hand file the graphite marked areas, and repeat. After a couple of dozen times repeating this process, I will have a plug that fits inside the horn, makes a smooth uniform fit around the circumference, and when installed will leave about 1/4 of plug exposed. To get a really well fitting plug, this process will take more than an hour of hand work alone. Cheap horns have sloppy joints here, don't make your horn that way.
Photo 5:

Then I finish by marking the insertion depth on the wooden plug, which is then used to mark the shape of the wood for forming the plug into a dome in the next stage.
Photo 6:

- - - - - - - - - - - - - - - - - - - - - - - - - - - -
Step 5: Shaping the Wood Plug into a Domed Shape. I use a band saw to very carefully remove the large sections of wood down to the marked line. This is pretty dangerous, and notice that I am holding the wood behind the blade teeth, and take little bites. Still, it isn't safe. Just ask Sam Maloof, he says the same thing as he is whipping out a rocker arm on his bandsaw!
Photo 7:

For the faint of heart, I would recommend doing the entire dome shaping with a disc sander, or a hand file. I have done it that way many times, but I have become pretty proficient with the bandsaw in sculpting and shaping operations. You will notice that at this time, I still have all 8 fingers and 2 thumbs, even after using power tools for woodworking for the past 35 years, or so (I started pretty young).
I further shape the dome with a disc sander, hand files, and sandpaper, taking care to get a uniform dome all the way around the plug.
I like to use a very fine wire wheel to gently weather the wood surface, and a sanding mop to finish the job.
There are many ways to stain, or darken, or antique the wood. The method I prefer is to use an alcohol based Leather Dye in the medium brown color. Swabbing on a little dye takes very little effort, but care should be taken to keep it off the fingers, as it will make your fingers look like they have been into unsightly places, and can not be washed off. My fingers usually look like that, so I don't worry about it anymore, it is sort of a 'badge of honor' these days.
I let the dyed surface dry for several hours. Any oil based wood stain would work well for coloring the wooden plug, but I would not recommend water based stains as they cause the soft pine grain to raise while staining. After the stain is dry, I buff it on the sanding mop again, as this gives it a more naturally worn appearance. For finishing the dyed wood against water I prefer to use a wax.
Photo 8:

- - - - - - - - - - - - - - - - - - - - - - - - - - - -
Step 7: Cutting off the Tip of the Horn.
This is a critical step, and care and practice are the best teachers. I have a few horns that I use for inlay material, as I was too sloppy in this operation when I was first learning the process.
You have to find the transition from the hollow cavity to the solid tip. That secret is in my “buy it” copy of this material. I leave a little room and cut off the tip.
Photo 9:

- - - - - - - - - - - - - - - - - - - - - - - - - - - -
Step 8: Drilling the Tip Hole
This may seem like a scary operation, and it is, especially on your first few horns. Well, to be honest, it has been scary on every horn I've done. Practice is the best teacher here; make sure you buy more than one horn blank, just in case. Drill slow, avoid any drill bit heat if you can.
Photo 10:

At this point, a tip plug must be selected, so that the hole and plug can be fit for a snug, airtight fit. In the past, I have taken an hour on the lathe to turn my own tip plugs, which is fun, although it takes a sure hand on the lathe, and some micro-lathe tools. An historically accurate alternate method is to use antique violin keys for the tip plug. They are also hard to find, so I clean out the supply whenever I run onto a place that has them on hand.
Making a straight hole is easier, but fitting a tapered hole is better, which fits the tapered violin key shaft, and allows for inserting the tip plug into the hole, where it is always tight and secure. I use a tapered reamer to carefully taper the hole.
- - - - - - - - - - - - - - - - - - - - - - - - - - - -
Step 9: Decorating the Tip by Hand- Filing
After studying photos of old horns, and authentic horns in museums, it became obvious that there is not a consistent style of horn tip decoration. Bear in mind, that the powder horn was merely a storage vessel for black powder, and the final appearance would have been dependent on the artistic ability and available free time of the craftsman building the horn, just as it is today. If you were trying to keep warm waiting on the enemy to do something, you might spend your daylight hours making your horn pretty. If you were on the move, and exhausted, it might not get decorated. See the difference? People were the same then, as they are now, always busy, probably more so, and utilitarian items existed for every aspect of life. The folk-art that remains for us to see today are the exceptions. The junk got tossed, just like we do now.
Also, there is no fast way to do this, all the work is with various hand files.
Photo 11:

I use a flat bastard file and looking on the inside of the hollow section of the horn, I find a place that seems like if I file down into the white area, I will come across a dark tip area. This is best learned by experience. At some point, there is a place on the white horn, where I can file a reduced diameter on the horn end that allows for a sharp contrast in colors. This is how the color brown, or black, color is used to decorate the horn. Once this area has been located, I file a line around the circumference of the horn, and hope the lines meet as I go around. I file about 1/8" deep.
Photo 12:

Then, I move up the tip of the horn, and file a second line around the circumference. Then, using the flat file, I file the space in between the lines until I have a consistent brown, or black, color, and the entire area is about 1/8" deep, and is smooth and consistent. This process will take about 2-3 hours, depending on how diligent I am at working hard, and how sharp my files are.
After this area has been adequately filed, I take another file that I have ground off the cutting teeth from one edge, and use it to gently shape the cut line to a smooth line around the circumference of the horn.
I then sand carefully the filed area to remove any of the file cutting marks. The sanding process takes about 1-2 hours. I always sand with the grain of the horn, which runs from tip to base along a curve. Some horn makers only use a scraping action by a sharp knife, or a piece of glass. I have done that, but I prefer the sandpaper. The scraping produces really fine "bounce" marks, that show up later when I am trying to scrimshaw the white surface of the horn. Still, if somene wants that look on the horn, I will give it to them that way.
Experience will teach the sound the file makes as it cuts a consistent thickness of the horn material, and the warning sounds if it is getting too thin. If I go through the horn material, the horn is ruined; I just start over, and use this horn for another purpose, usually a reminder to be more careful!
Photo 13:

Photo 14:

The next step is to define the tip flare. I again cut with a file, the full circumference of the tip, making sure that I keep the worked area around the tip hole consistent.
I file a tip flare that gives both a good appearance, and provides a lip for pouring into a powder-measuring device used to measure the amount of black powder that is then poured down the barrel of the rifle.
Next, I like to use a method of filing flats in the shape of a tapered octagonal shape. This is consistent with many historical horns, and it also matches the flats of the rifle barrel of an historic gun.
To do this, I start by using the large end of the horn, and dividing that circumference into 8 approximately equal areas, using my eye, no measuring tools. Then I draw up the grain line of the horn all the way to the tip, the eight divided areas. As the lines converge to the tip, they will show where to file the flat sides on the tip.
Photo 15:

I have found that to adequately do this portion of the work, decorating the tip, will take between 6-8 hours of work. With the files and sandpaper. Sure it can be done faster, but why would you? Enjoy the craft, you can't sell the piece for the hours you have in it, no matter how fast you do it. So, you might as well just enjoy the art and the craft, and your watching your hands do the work.
- - - - - - - - - - - - - - - - - - - - - - - - - - - -
Step 10: Installing the Wood Rear Plug
Now the tip of the horn has been successfully drilled and decorated, it is time to install the wood plug in the large end of the horn. Using the 8 divided areas used earlier to define the octagonal flats on the tip, I drill a hole with a drill bit that is slightly smaller than the diameter of the peg used to secure the horn plug.
I like to use round toothpicks, but have also used Locust Tree spikes, bamboo BBQ skewer sticks, and also dowel rods, and whittled match sticks down. I like the look of the toothpick the best. I pick out about a dozen toothpicks that have a consistently round diameter, and clip off about 5/8" of the ends, making a small wooden nail out of the toothpicks.
Photo 16:

After I have drilled the holes in horn, I insert the wooden plug in the hole, and holding it tightly with one hand, drill a small pilot hole in the soft pine plug. The historical method of sealing the plug in the horn is a 50/50 mix of Lard and Bees Wax. If you are short on these materials, you can use regular wood glue, or a clear epoxy. I have tried all three methods. I have looked at dozens and dozens of historical horns in books and museums, and rarely is the wood plug intact, or in good shape. Usually, the horn has split, the wood plug is missing, or is in bad shape, and so I realize over time, the natural movement of these materials may be something that none of us can stop. I feel that over time, the epoxy is the best fastening method for keeping things together and airtight over the years.
Photo 17:

So, putting a small amount of glue, or Lard/Bees Wax, around the inside circumference of the horn, I insert the wood plug and push it up tight in the hole. Holding it with one hand, I put one drop of wood glue in the predrilled hole, insert the wood pegs in the predrilled holes, and tap them lightly with a small hammer until they are tight.
- - - - - - - - - - - - - - - - - - - - - - - - - - - -
Step 11: Forming and Installing the Steel Staple
To form a staple to hold the end of the horn strap, I prefer to use a method that is both historically accurate, and is fairly simple to perform. I use a 6d or 4d steel finishing nail. It is first pounded square by hammering on a small anvil. Careful, it is easy to hit your hand, and as the nail is cold-worked, it gets very hot, and can burn the skin. I hold it with a needle nose pliers, or just lightly tap it while it is lying free on the anvil.
Photo 18:

I use the jaws of the vise to hold one end of the nail, and bend it into an 'L'. Then do the same thing to the other end, forming a 'U' shape. I sharpen both ends with a small file, so that they are the same length, and sharp. After the cold working, I use a torch and heat treat the nail to a blued finish. This gives it a great patina, and is a natural corrosion protection for the steel.
Photo 19:

I then hold the staple points against the wood dome and tap it slightly making marks for the holes in the wood. I prefer not to just drive the staple with a hammer, as there have been many hours to get the wood to this point, and splitting it in half by driving the staple is something I wish to avoid, again.
So, I use a drill bit slightly smaller than the diameter of the staple points, and make two holes in the wood. Then I gently drive the staple into the pilot holes, being careful to get it uniformly installed. I prefer to place the staple a little above the mid point, not sure why, just my preference.
Photo 20:

- - - - - - - - - - - - - - - - - - - - - - - - - - - -
Step 12: Final Sanding and Preparation for Engraving
If the horn is to be engraved, or some call it Scrimshaw, then the surface of the horn needs to be smoothed and free from scratches. I use sandpaper for the big scratches.
Photo 21:

To produce a smooth satin finish ready for Scrimshaw, I use #0000 Steel wool. I go back and forth gently sanding the horn with the steel wool until the entire surface is free from errant scratches, and it has a nice satin appearance and touch.
Photo 22:

And after several hours, and some plugged up sinuses, you are finished. Now, go back in the house to your significant other, you probably need to spend some time in the house for awhile. After you wash off the manure smell of the horn dust, and change your clothes of course, outside!
- - - - - - - - - - - - - - - - - - - - - - - - - - - -
Congratulations!
Photo 23:

- - - - - - - - - - - - - - - - - - - - - - - - - - - -
Ok, if you are still riding along with me,
the next step is to Scrimshaw engrave your powder horn.
That process is quickly described here: http://lumberjocks.com/jocks/decoustudio/blog/2473
- - - - - - - - - - - - - - - - - - - - - - - - - - - -
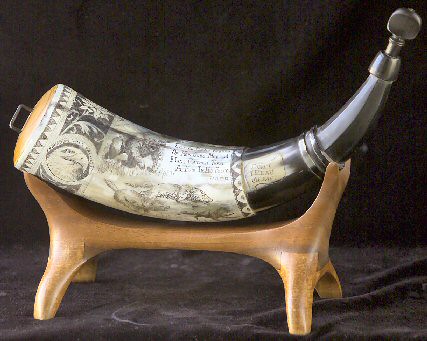
If you would like to see more, here are a few photos of some horns I have built:
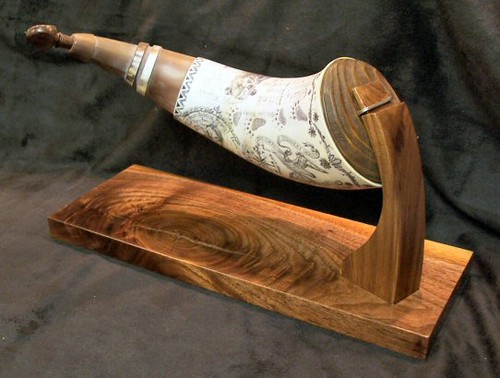
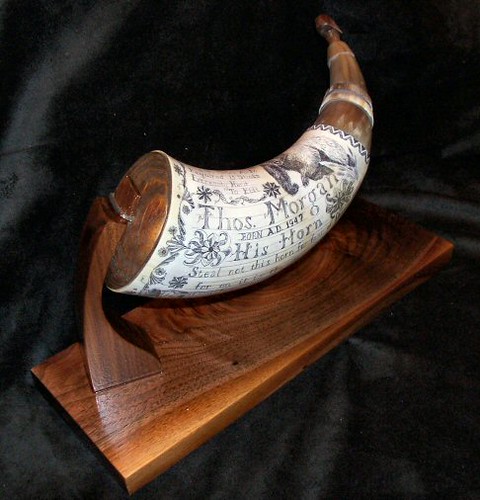

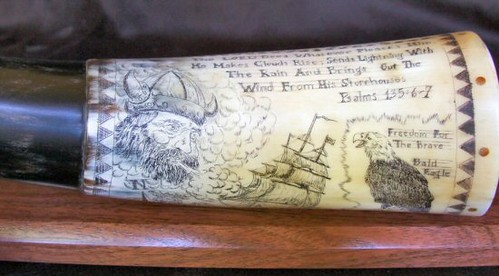
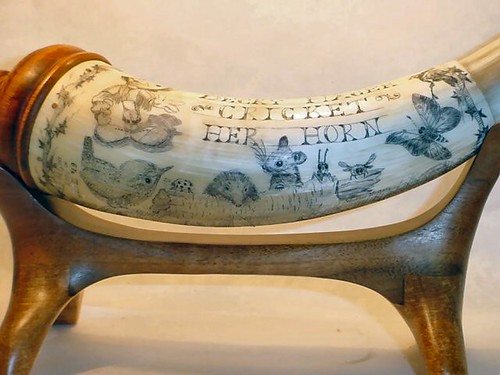

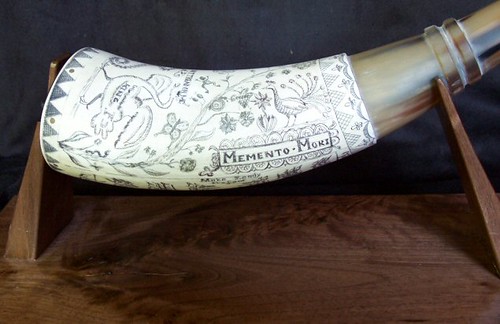
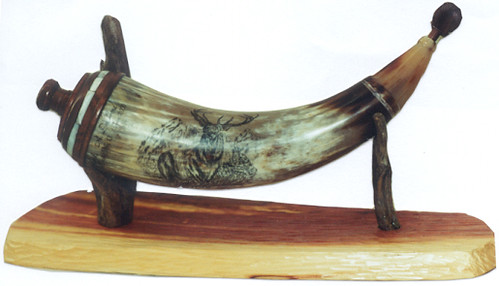
-- Mark DeCou - Kansas Flinthill's Artisan
Return to Powder, Patch and Ball